Vagrant Troubleshooting
Vagrant Has Never Run Successfully on Your Machine
The following are all errors which happen during vagrant up when you run it for the first time.
‘No usable default provider’ error or VirtualBox not automatically installed
If you get an error which begins No usable default provider or if Vagrant doesn’t offer to install VirtualBox for you (and you haven’t previously installed it), you’ll need to do so manually.
- Go to https://www.virtualbox.org/wiki/Downloads.
- Download and install the correct version for your machine.
- Once it’s installed, run
vagrant upagain.
‘VT-x disabled in BIOS’ error
If you get the following error: VT-x is disabled in BIOS for all CPU modes, chances are you’re on an older PC (likely Lenovo, HP, or Dell) which has VT-x virtualization disabled by default, and you’ll need to manually enable it.
The process for enabling it varies by machine, so google how to enable virtualization using the BIOS for your particular brand and model of computer.
Once you’ve enabled virtualization, start you computer back up, get back into Git Bash and cd to your vagrant directory, then run vagrant up again.
‘Invalid NIC number 36’ error
If you get the following error: There was an error while executing VBoxManage, followed by a bunch of output up to VBoxManage.exe: error: Invalid NIC number 36, you’ll need to change the configuration to point to a maximum of 8 network adapters.
To do so:
- Navigate to C:\HashiCorp\Vagrant\embedded\gems\gems\vagrant-1.9.1\plugins\providers\virtualbox\driver\.
- In that directory, you’ll find a file called base.rb; open it in Sublime.
- Find
def max_network_adapters 36 end. - Replace 36 with 8, so that it reads
def max_network_adapters 8 end. - Save and close the file.
- Run
vagrant upagain.
Process hanging after ‘default: SSH auth method: private key’
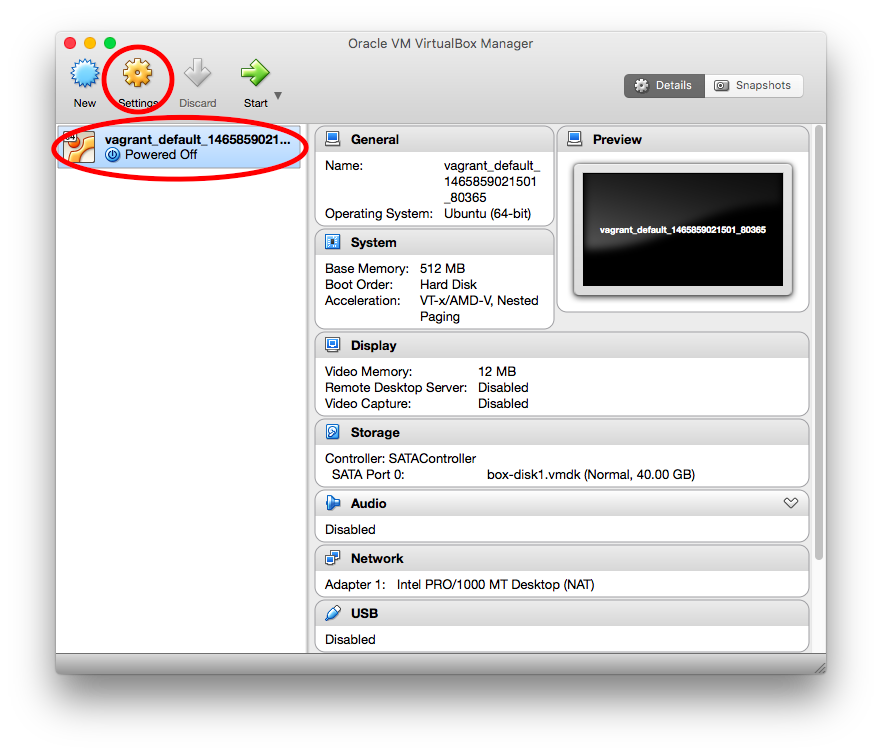
If you do vagrant up and the process hangs after the line default: SSH auth method: private key for more than a few minutes (possibly repeating the line default: Warning: Remote connection disconnect. Retrying... over and over), you may have run into the infamous ‘disconnected cable’ bug.
Open the VirtualBox app on your computer.
Select the vagrant virtual machine in the dashboard and then click “Settings”.
In settings, choose the “Network” tab.
Click the arrow next to “Advanced” to show the advanced settings.
Make sure the “Cable Connected” box is checked.
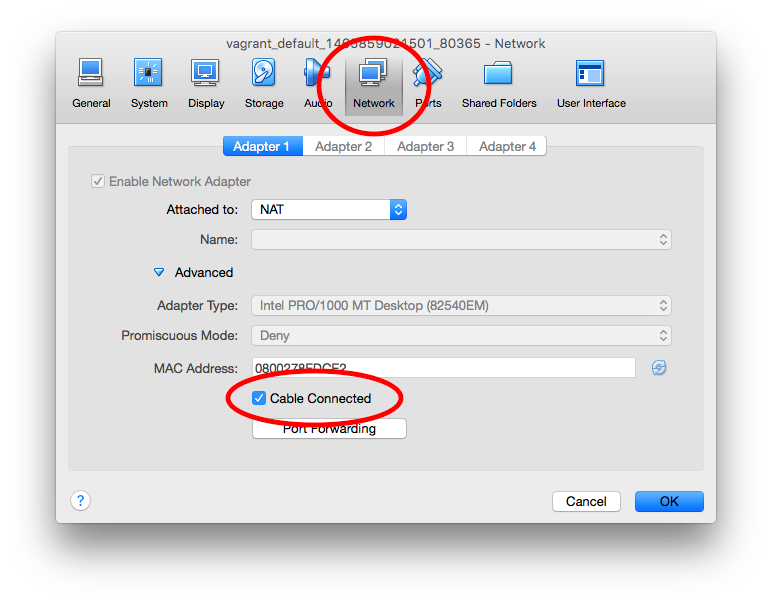
Click OK to save the settings and run
vagrant upagain.
Cable connected but process still hanging after ‘default: SSH auth method: private key’
If you’ve followed the instructions above and your cable is already connected (or if vagrant up still hangs even after you connected it), you may have virtualization disabled on your machine.
In VirtualBox, click ‘Show’ (next to Settings) and see if the screen of the virtual machine has an alert which says, VT-x/AMD-V hardware acceleration is not available on your system. Your 64-bit guest will fail to detect a 64-bit CPU and will not be able to boot. If so, you’ll need to manually enable virtualization.
The process for enabling virtualization varies by machine, so google how to use the BIOS to enable it for your particular brand and model of computer.
Once you’ve enabled virtualization, start you computer back up, get back into Git Bash and cd to your vagrant directory, then run vagrant up again.
‘Box ‘base’ could not be found’ error
There are two possible reasons you’ll see this error:
- You are trying to run
vagrant upfrom somewhere other than inside your vagrant directory. (Remember that you can always usepwdto see where you are.) Usecdto move into your vagrant directory and try again. - You’re in the vagrant directory but don’t have the right `Vagrantfile `in said directory.
- Open your Vagrantfile and make sure it says “Hackbright Version” at the top.
- If it doesn’t, download this zip file, and replace the files in your vagrant directory with the ones in the zip. (Don’t worry if you’re on a Windows machine that this file is called ‘install-osx’; the files are the same for both platforms.)
- Run
vagrant upagain.
‘Vagrant cannot forward the specified ports on this VM’ error
If you see this error, it means you have some other process hanging onto the port specified in the sentence The forwarded port to [port_num] is already in use on the host machine. (This should be the second sentence of the error.)
If you already know what process that is, quit it and try again.
If you don’t, try running lsof -i :port_num (if you’re on a Mac) or netstat -a | find "port_num" (if you’re on Windows), replacing port_num with whatever port is blocked. Then quit that process and try again.
‘mesg: ttyname failed: Inappropriate ioctl for device’ error
You may see the above error twice during the vagrant up process, once at the beginning, and once at the end. The details are somewhat complicated, but the short version is that it’s not something to worry about.
Can’t Find your Files in Vagrant
The src directory is missing inside vagrant
If you can vagrant up and vagrant ssh, but once you do that, you don’t see your src directory, there are two possible reasons:
- The original (the one on your computer) is in the wrong place.
- Use
ctrl-Dto get out of ssh. - Run
vagrant haltto turn off your virtual machine. - Make sure src and vagrant are sibling directories inside your home directory.
- Run
vagrant upandvagrant sshagain.
- Open your Vagrantfile and make sure it says “Hackbright Version” at the top.
- If it doesn’t, download this zip file, and replace the files in your vagrant directory with the ones in the zip. (Don’t worry if you’re on a Windows machine that this file is called ‘install-osx’; the files are the same for both platforms.)
- Inside your vagrant directory, run
vagrant destroyto get rid of the malformed machine you were using before. - Run
vagrant upandvagrant sshagain.
The src directory exists inside vagrant but your files aren’t there
Make sure your files are in the original version of the directory (on your computer).
Can’t Connect to Vagrant, But it’s Worked in the Past
If you’ve gotten vagrant to work before, but now it’s giving you an error, check out the fixes below.
‘VM must be running to open SSH connection’ Error
Typically you’ll see this error if you’ve run vagrant ssh before running vagrant up. Run vagrant up first, then try vagrant ssh-ing again.
‘Box ‘base’ could not be found’ Error
See this same sub-section in the “Vagrant Has Never Run Successfully on Your Machine” section above.
‘Vagrant cannot forward the specified ports on this VM’ error
See this same sub-section in the “Vagrant Has Never Run Successfully on Your Machine” section above.
Can’t pip install Inside a Virtualenv Inside Vagrant
If you try to use a virtualenv that was created outside of vagrant - or created in another directory and then moved - your PATH environment variable won’t be set properly, and the shell will default to the system pip instead of the virtualenv pip. The system pip will attempt to install the package system-wide (which you usually don’t have permission to do, causing an error).
You can check to see if this is the case by typing which pip — if the
answer comes back /usr/bin/pip, then do the following:
- Run
deactivateto leave the virtual environment. - Delete the virtual environment using
sudo rm -rf env. (Be very careful with this command, as it is not undo-able!) - Create a new virtual environment by typing
virtualenv env - Activate and install as usual.
Can’t Get Flask Running
‘socket.error: [Errno 98] Address already in use’ error
If you get this error when you try to start your flask server, it probably means you have another server already running. Do you have any other tabs or windows where you’re also ssh’d into vagrant and might be running a server? If so, close them and try again.
If not:
- Use
ctrl-Dto exit ssh. - Run
vagrant reloadto halt and restart your virtual machine, thenvagrant sshto get back into it. - Navigate back to the location of your server and try running it again.
If All Else Fails
Sometimes, vagrant runs into inexplicable hiccups. In this case, often the best solution is to simply start again.
- If you haven’t already, before you do anything else, send us an email or come talk to us in person to let us know what problem you’re having, along with which steps you’ve taken to fix it. This is really important! Most of this document comes from us having debugged student problems with vagrant, so you’re making it easier for future students by helping us learn where the problems lie.
- If you’re ssh’d into vagrant, use
ctrl-Dto exit back to your native terminal. - Run
vagrant destroyto get rid of your broken vagrant machine. (Don’t worry - this won’t delete any of the files in your src directory.) - Make sure you have the files from this zip file, in your vagrant directory. (Don’t worry if you’re on a Windows machine that this file is called ‘install-osx’; the files are the same for both platforms.)
- Run
vagrant upandvagrant sshagain.